Learning Git
18 April 2014
Last autumn I figured out how to use Git by following some online tutorials and reading up on it. In order to solidify my understanding, I did some writing and sketching in Google docs to explain to myself. I’d always intended to publish the work on my blog to share my understanding for the benefit of other newbs who might appreciate it.
I’m not going to write here about installing Git, since that’s been covered elsewhere. This post primarily attempts to share my understanding of Git’s mental model, since it’s infamously opaque. If you are like me was when I first tried to learn Git, you may have installed it, did some follow-along basic tutorials, but remain confused.
I like to understand something’s history because I often find complexity is built on simple foundations. So I begin this with some history of the Command Line Interface because that is how I initially learned to use Git rather than use a GUI exclusively.
You’re probably already familiar with the fact that Git came out of Linux development and its popularity blossomed in 2009. Searching for Git tutorials you’ll find articles with timestamps going back to that year, probably because Github launched in December 2008. I seem to recall hearing about Git in 2007 or early 2008, having seen through Facebook the link to Linus Torvalds’ Google Talk on YouTube.
There’s another cluster of tutorials dating to 2010, and some more from early 2012, when I first tried to learn it.
I registered my Github account in February 2012, but at that point I only gained familiarity with Git. My workflow at the time had developed without version control, and I’d developed my own code-backup techniques while working on projects, where there had been no need to worry about code-overwrites and conflicts by other programmers. Last year however, I began to encounter those problems, which reminded me that Git existed for a reason and that it was great time to finally learn it.
A Git GUI was always an option but prior to last autumn I didn’t understand what Git was doing well enough to be able to understand what a GUI offered. Since then, I’ve found Github’s (Mac/Win) very useful in situations where I couldn’t install Git universally on a machine.
So, for the purpose of this overview, I’ll focus on the Command Line Interface in order to highlight what a GUI can automate for you.
Echo History

I remind myself that programming is the latest version of alchemical magic – an abracadabra priesthood, where we cast actual word-spells by typing them onto screens resulting in things appearing out of thin air, which we colloquially call The Cloud. I don’t say this to obfuscate or insult – but to highlight that an ancient social place once occupied by wizardly people looking to turn lead into gold is now occupied by coders with a culture developed around an appreciation for obscurantism once enjoyed by secret-society wizards.
The continued existence of the Command Line Interface (CLI) is a legacy of this coding culture. On the one hand, the CLI offers efficiency – when you know how to use it, you can do things a lot faster, and on the face of it, that accounts for its continued existence. But secondary to this is the romantic pull of wizard work, the hipster distinguishing themselves from the newbs by their knowledge of the command line. The use of the CLI speaks of professional skill, and learning the CLI is well worth it.
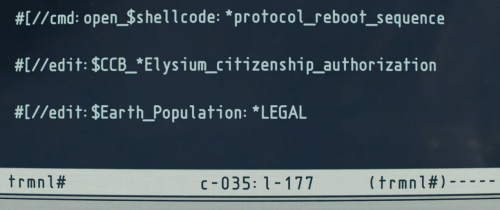
Plus, as we saw in Elysium, people will still be using a CLI in 140 years so it’s not like the skills will ever fall out of date.
The CLI was developed in the teletype era, which is relevant: it was created by adults who’d used typewriters and had learned to be precise typists. I’ve found the CLI to be inconvenient at times precisely because spell-check has made me an indifferent typist – typos are easy to fix. With the CLI, one has to be extra careful and accurate.
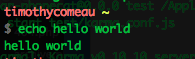
Let’s put ourselves in the mindset of using typewriters, and imagine how strange and exciting it might be to hammer out through a ribbon the words:

and have that magically appear on the paper’s next line. The mindset of the Command Line was to see the screen as animated paper, and one could imagine everything happening behind it, in the aether.
The CLI preserves this model of imagination, as we see with its MySQL interface. Unlike a spreadsheet, which combines structure and content visually, the MySQL CLI preserves the mental space of typing out the structure (which had to be typo free) and then populating it with a series of insert commands. To check the work you’d be presented with an ASCII art table structure.
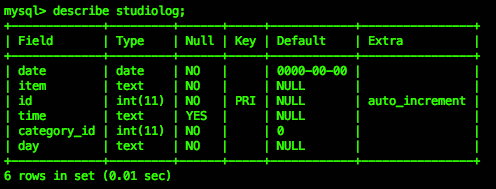
The existence of ASCII art reminds us there’s an esoteric aesthetic pleasure associated with such rudimentary displays, but it seems that the spreadsheet is evidence that a GUI is more conceptually efficient. An Excel like spreadsheet presents both data and structure and makes it easy to instantly insert or modify the information where appropriate.
Git push origin master wtf
The pride of mastering the secret ancient language of the CLI means you get non grammatical nonsense like “git push origin master”. What that means to humans is you’re telling the program to upload what you’re working on (your “master” files) to the “origin” which you’ve elsewhere defined.
Someone with a degree in the humanities may have structured Git so the command would be “Git, upload this file to the server” but I should note here that an “origin” – otherwise known in Git parlance as “remotes” – can exist anywhere, not necessarily on Github, nor for that matter anywhere else on the Cloud. A remote can be defined as being in another directory on your computer, which is an approach I use to create “master archives” of my projects. At some point in the future, in order to retrieve the files, I’ll simply need to clone the .git file at that location. (See my “working with remotes” section here.)
Another point: notice how with the command line we begin our command with Git’s name, ie “git init” or “git commit …”, and this is reflected in how we’re supposed to use something like Google Glass or even Siri. The “name to initiate/specify” is an established pattern from using Unix command lines.
Repositories (Repos)
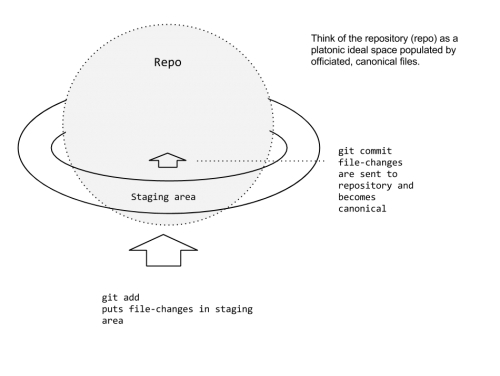
The first thing to learn with Git are the basics of repos and stages. Imagine the repo as a spherical space, with the stage encircling it. The process of code editing, staging and committing can be imagined as a spaceship parking itself above the rings of Saturn (staging) and then committing to the mission of flying into its atmosphere.
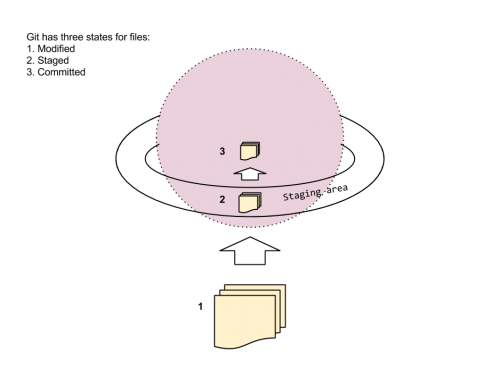
Here’s an example workflow. Imagine we’re working on a web project. With the CLI, we cd into the folder and turn on/initiate Git by typing git init. Then we’ll add all files in the folder/directory by typing git add .
git init
git add .
Then we’ll make the first commit. Note the following is incorrect, which I’ll explain below:
git commit "my first commit"It is incorrect because the command lacks the –m flag. I write this because when I first tried to learn Git, I missed this and was kicked immediately into a text editor, which was a terrible user experience. Simply, you cannot commit without a message, and the messages become an invaluable log of your work’s progress.
Thus, the correct way to commit is:
git commit –m "my first commit"As we’ve seen, the workflow here includes the git add . command, which will add all files in the relevant directory. But if we’ve made edits to an index.html file, we need not re-add everything else. In this case, we add that file individual and commit it:
git add index.html
git commit –m "edits to index.html"
However, both of these commands can be compressed into one, with the use of the –a flag, which stages the file. If one were to run git status on the directory, Git having tracked the files, will present us with a list of files on which changes have occurred. Git knows they’re changed, but they aren’t necessarily staged, since Git allows us to decide when we might want to stage them. If we’re comfortable, we can stage and commit them at the same time with the –a flag.
git commit –a –m "committing files"
// This stages all changes
// and tracked files and
// commits them to the repository.
Branches
Beyond these basics, the second conceptual model to understand is that of branches. Git is based around the familiar “tree” like structure of nested files, and I’ve seen different ideas in other tutorials to explain them. The clearest one helped me understand that a branch isn’t so much something like this …

… as it is something like this:

This second illustration also shows two pointers … Git’s reference marker, or it’s conceptual cursor, is called “Head” and it can be understood as a pointer. The main trunk/branch is called “master” by default.
Here we have a repo and a series of previous commits, and we see the last commit is the Master Branch, and the project’s up-to-dateness “cursor” is located there.
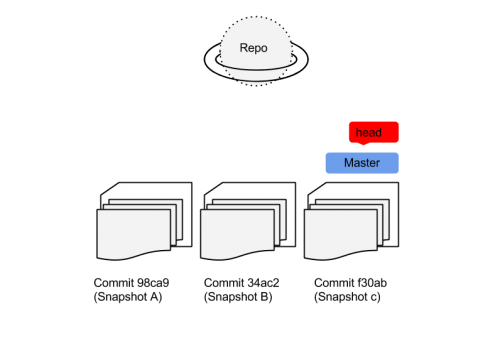
It’s worth noting that a branch and a commit are the same thing: each commit creates a silo snapshot of the files states and at any time you can name a commit and turn it into a branch.
Branches in Use
I understood branches when I saw files appear and disappear in my OS X Finder window. The beauty of Git as something that runs in the internals of your machine is that the file states are represented wherever they are reflected – like in your IDE or in the Finder window. Files removed in one branch may reappear in a Finder if that file continues or alternatively exists in another branch. Git branches can be used to maintain two separate file states, and thus you can create different working versions of a project simply through branching.
If you decide you no longer want a branch, they can be easily eliminated, and you can merge any branches you wish.
Check it out: roll backs and sharing file between branches
Why have a version control system if not to access earlier file states? We do this with the checkout command. You can either checkout an entire previous commit as a branch (turning it into a branch as mentioned):
git branch branchname #hashvalue
// examp: git branch sunflower a9c4
Or you can checkout an individual file, in this case a css file:
git checkout --style.css If you’ve updated a file in the “master” branch and want to bring it over to a “deploy” branch, you checkout “deploy” and then checkout the file from the master:
git checkout deploy
git checkout master index.html
In the above example, I used index.html, which would live in the “master” directory’s root. For something like a css file located within a directory, you’d need to specify the path:
git checkout master css/style.css(Nicolas Gallagher also wrote about this in Oct 2011.)
To conclude
After these conceptual basics were understood, I found Git to be pretty straightforward. I now comfortably create, merge, eliminate branches and maintain different ones as I develop my projects. I use Github’s GUI for push-button ease-of-use, but I know how to use the Command Line when I need greater control.
I also created my own git cheat-sheet for when I can’t remember exactly how to type a command, and this can be found at gitref.timothycomeau.com
Further Resources
Learn Git
this site just launched this past week
and features beautiful illustrations.
Git How To
this tutorial helped me the most
- Published to my blog 18 Apr 2014
- Aug/Sept 2015: this version produced with minor copy edits